

Please accept my apologies, but I have moved to a new blog. My new blog is: merileelane.blogspot.com. Please come join me there where I am posting new projects!
Thanks!
Merilee
Thursday, June 16, 2011
Thursday, March 4, 2010
Hello everyone. Hope this finds you happy and healthy and enjoying some warmer, more spring like weather.
Today I'd like to share with you another card. This card was part of a feminine birthday collection I made for a client. Unfortunately, I cannot remember all of the ingredients because I made it so long ago.

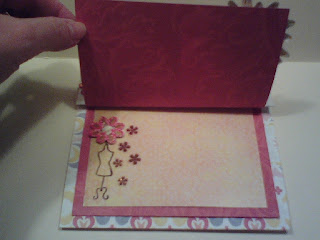
The stamps I used were from the dollar bin at Michaels.
Thanks for stopping by! Have a great day!
Merilee
Wednesday, March 3, 2010
Christmas Invitations
Hello everyone! I know you are anxiously awaiting spring (and I am, too), but since I'm not creating as of yet (I took a bit of a turn for the worse in my recover process), I thought I'd share some older things with you. Today I'm popping in to share some Christmas invitations I designed for one of my clients.
For these invitations I used my Cricut, as well as some clip art given to me by my client. My client loves funky, fun retro style and pin-up girls so this was my take on that theme. I made up a set in two different colors reflecting the colors used in that era (I'm dating myself now...)
 This is the boxed set as it was presented to my client. It showcases the pink and green color combo for the first half of this set. My client specified these invitations would be hand delivered, so the envelopes I chose to use were open on top and gave a bird's eye view of the ornament card inside.
 I used both glitter papers, as well as hologram papers to make this card. I also used my Martha Stewart punch to add the pine needle detail that peeks out from underneath the ornament topper.
 This is a view of the back of the ornament which has all of the party details and features the clip art provided by my client. On the inside of the envelope I printed my logo on vellum so it could be seen through the window once the invitation was removed.
 This is the second color combination. I switched out the silver with gold and did a semi-traditional red and green, adding in a splash of pink. You may not be able to see it from this photo, but pink was also in the patterned paper. The ribbon was wrapped around the back of the envelope and pulled through eyelets on each side. I used gold ribbon on this card and silver on the card above.
 Here is a photo with the card removed. I used my Martha Steward punch for the snowflakes in the lower right-hand corner, as well as a little snowflake bling I found at Wal-Mart.
 This is the opposite side of the ornament. The invitations are identical except for the color combination and choice in patterned papers.
Now let's see if I can identify the ingredients:
Cardstock: Best Occasions Cardstock Pack
Patterned Paper: DCWV Holiday Stack
Glitter Paper: Best Occasions Glitter Paper Pack
Hologram Paper: Best Occasions Prismatic Paper Pack
Ribbons: Offray - Flair Silver; Flair Gold
Cricut Cartridge Used: Christmas Cheer\
Punches: Martha Stewart Snowflake, Pine Needle
Hope you like them!
Have a great day,
Merilee
For these invitations I used my Cricut, as well as some clip art given to me by my client. My client loves funky, fun retro style and pin-up girls so this was my take on that theme. I made up a set in two different colors reflecting the colors used in that era (I'm dating myself now...)
This is the boxed set as it was presented to my client. It showcases the pink and green color combo for the first half of this set. My client specified these invitations would be hand delivered, so the envelopes I chose to use were open on top and gave a bird's eye view of the ornament card inside.  I used both glitter papers, as well as hologram papers to make this card. I also used my Martha Stewart punch to add the pine needle detail that peeks out from underneath the ornament topper.
 This is a view of the back of the ornament which has all of the party details and features the clip art provided by my client. On the inside of the envelope I printed my logo on vellum so it could be seen through the window once the invitation was removed.
 This is the second color combination. I switched out the silver with gold and did a semi-traditional red and green, adding in a splash of pink. You may not be able to see it from this photo, but pink was also in the patterned paper. The ribbon was wrapped around the back of the envelope and pulled through eyelets on each side. I used gold ribbon on this card and silver on the card above.
 Here is a photo with the card removed. I used my Martha Steward punch for the snowflakes in the lower right-hand corner, as well as a little snowflake bling I found at Wal-Mart.
  This is the opposite side of the ornament. The invitations are identical except for the color combination and choice in patterned papers.
 Now let's see if I can identify the ingredients:
Cardstock: Best Occasions Cardstock Pack
Patterned Paper: DCWV Holiday Stack
Glitter Paper: Best Occasions Glitter Paper Pack
Hologram Paper: Best Occasions Prismatic Paper Pack
Ribbons: Offray - Flair Silver; Flair Gold
Cricut Cartridge Used: Christmas Cheer\
Punches: Martha Stewart Snowflake, Pine Needle
Hope you like them!
Have a great day,
Merilee
Tuesday, March 2, 2010
News from the doctor...
Hello everyone. This is just a quick post to talk about my follow-up doctor's visit yesterday.
For those of you who don't know, I've been sick since December 28th. I caught a virus and/or cold, which spiraled into strep, and then again morphed into a severe case of pneumonia. As a result, I now have a full-blown case of asthma.
The doctor wasn't happy yesterday, let's just say that. He doesn't think I have a bacterial infection anymore, but my lungs are still full of congestion and the asthma is not improving. He switched out my meds once again and is hoping it will help; however, if it doesn't, I'm looking at seeing a pulmonary specialist and possibly an extended stay at the hospital. He did not increase my steroids back to what they were, which he really wanted to do, but I'm suffering from too many side effects so he is trying something else, instead. The doctor prescribed a different non-steroidal oral anti inflammatory on top of the steroids in hopes that this will give me the extra boost I apparently need.
I asked the doctor to put me in physical therapy, but he doesn't want me exercising right now because it will only exacerbate the asthma. I asked him about helping me with either a water pill or diet aide, but he also doesn't want me taking anything for dieting right now with all the other meds I'm on. He did, however, prescribe a water pill, but warned me ahead of time that it probably won't do anything.
The doctor also wants me to call my ear, nose and throat doctor and schedule myself for tubes in my ears and surgery to have my tonsils out...fun. My right ear is trying to become infected again and my sinuses are congested, too. This is long overdue--I should have had it done years ago.
I had hoped the news would be better. My wheezing is very bad, even though I'm doing every single thing the doctor has prescribed, including being chained to this nebulizer machine every four hours.
I'd be lying if I said I wasn't disappointed, but I've been thinking things over and I believe wholeheartedly that we are, in life, right where our Father wants us to be. Is there something to learn from this experience? He's keeping me still and quiet...is there something He is trying to tell me? I think so. I think there is much to be learned and I will meditate and pray on exactly what that may be.
In the meantime, I realize that I have absolutely no control over my recovery. I've been trying to think of things all along that might help move my recovery process in the right direction, but it seems as though that is not what I need to be doing right now.
My final thought...I think maybe I need to give up trying to control things and just trust that God has me exactly where He wants me to be right now. Patience is the name of the game and I need to let go and let God.
That's it in a nutshell. Thanks for listening.
Values.com Quote of the Day
Today I'd like to share a beautiful quote I received from Values.com. I love these quotes and frequently use them in my cardmaking. Enjoy...
“If you were all alone in the universe with no one to talk to, no one with which to share the beauty of the stars, to laugh with, to touch, what would be your purpose in life? It is other life, it is love, which gives your life meaning. This is harmony. We must discover the joy of each other, the joy of challenge, the joy of growth.”
—Mitsugi Saotome
(1937-); Aikido instructor, author
(1937-); Aikido instructor, author
I'll post again later. Have a great day!
Merilee
Monday, March 1, 2010
Happy March 1st!!!

Hello everyone! I'm so happy it's March 1st and spring is just around the corner. I can't wait!
Today I wanted to share with you a card I made back in August for my cousin's birthday. It's another example of a flip-flop card, only much different than the masculine version I posted yesterday.
Once again, since I made this card so long ago, I cannot remember all of the papers and embellishments I used...sorry. I do know that the pink cardstock used for the basic card is from Wal-Mart and the floral paper is from Amy Butler's collection. The butterfly came from a packet of three I found at Wal-Mart. The "eat cake" sentiment was from the dollar bin at Michaels. As for the remainder of the elements, I'm at a loss.
I never expected to be posting my cards in a blog, so from this point forward, I promise to be mindful of the recipe and ingredients for my upcoming creations.

The flip-flop card is a relatively easy card to make. I love incorporating unexpected details into my cards that the recipient will enjoy. I bought a book some time ago "Fabulous Folds for Card Making" by House of White Birches and edited by Tanya Fox. I was inspired by the Accordion Fold Chapter in which I found an example of the flip-flop card. I had such fun creating this card.
Each card I make I try to incorporate elements that are personal to the recipient in mind. In this case, my cousin has a very personal and spiritual kinship to butterflies. She lost her mother some years back (my very favorite Aunt Margie) and once confided in me that after her mother passed, a butterfly began to visit her, fluttering all around quite unafraid. My cousin felt certain it was her mother fluttering by to say hello and comfort her in knowing that her spirit lives on in Heaven. How appropriate that my favorite Aunt Margie would say hello with a butterfly...it suits her personality perfectly. Most things I create for my cousin are a reflection of that very personal conversation, as it touched my soul.
I hope you enjoyed this post and please leave a comment! I love to hear from you. Any and all suggestions would be most appreciated, too! I'm new to blogging and anything I can do to create a friendlier environment or to improve my creations can only make my experience that much better!
Have a great Monday, everyone!
Sunday, February 28, 2010
Masculine Birthday Card
 This is a card I was commissioned to make by a friend for her special man's birthday. I asked her to tell me a little bit about the relationship she shared with him. She told me he lovingly referred to her as his "nut" and she called him her "squirrel". This flip-flop design was my interpretation of the loving things she shared with me and I created it without a sentiment, as I felt these pictures spoke a thousand words.
Unfortunately, I cannot remember the exact recipe--I made this card in autumn, 2009. However, I can tell you that the autumn leaves are silk, the photos were simple photos which I altered in my photo program, then enhanced with both pencils and chalks, after which I sprayed with a matt spray to keep them from smudging.
My friend said her boyfriend loved it. She was worried I would create something animated and said she was pleasantly surprised when she received a tasteful, masculine card depicting their personal intimate relationship. :o)
The flip side of this card to follow...

Masculine Birthday Card
 This is the flip-side of this masculine birthday card. As you can see, I attached a simple tag with my handwritten "Happy Birthday". It was relatively simple to create and the results were well worthwhile. My friend expressed her delight when she received it in the mail. That, in and of itself, made my day.
It may be difficult to see, but the face of the envelope was designed to compliment the card, and I also lined the inside with corresponding papers. I attached silk autumn leaves with a brad to the front of the envelope, knowing this card was NOT going to go through the U.S. Postal System. I had to learn that lesson the hard way--they lost a very personal card in which I put my heart and soul into for my daughter. I'm certain it was chewed up in one of their machines.
I hope you enjoy my first card post!!
Happy Sunday!
Merilee
Hello Everyone!
Today I'd like begin by telling you about some fabulous blog candy available from True's Gifts from the heart, http://truesgiftsfromtheheart.blogspot.com. You really need to visit her blog and sign up to win! It's a huge package with lots of fun stuff. Good luck!
Now on to my brand spankin' new Cuddlebug machine!! Yesterday I spent the afternoon playing with it. I had a blast! My machine didn't come with any cool embossing plates-only the tiny stamp set, and I wasn't up to shopping, so I decided to try my Fiskars embosssing plates. First I went out to You Tube and watched a couple of video tutorials on how to use them. Then I got started.
Now, mind you, I have no supplies other than the Cuddlebug and my Fiskars plates, so I needed to improvise and use what I had on hand. The tutorials called for rubber mats used with Spellbinders, I believe. In the absence of those, I found an old mouse pad which I cut to the same size as the Cuddlebug plates (a, b & c). I then sandwiched everything together, along with one extra piece of cardstock, and voi·là, I had embossed cardstock!! Yippee!!!
I was thrilled that I was able to do this, however, upon close inspection, I did notice that the impression left by the Fiskars plates wasn't very deep. It will look better enhanced by chalks or paint or even a stamp pad. I'll play around with them and see what works best. I never throw anything away, so I will find a use for the many "samples" created.
In the interim, since I'm still too weak from the pneumonia to actually shop for Cuddlebug embossing folders at my favorite local stores, I decided to let my fingers do the walking and shop online. I was able to bid on some folders on ebay and they'll arrive sometime next week (hopefully)! I'll be anxiously awaiting the arrival of the mailman every single day! :o)
If any of you can direct me to websites which offer good deals on Cuddlebug embossing folders (or any other supplies), please let me know. I am always looking for affordable prices so I can splurge in other areas of my papercrafting! :o)
Have a great day!
Merilee
Saturday, February 27, 2010
Subscribe to:
Comments (Atom)


